
Table of Contents
Shoulder dislocation is a common injury and can also be a chronic problem. The likelihood of you dislocating your shoulder again goes up every time you dislocate it.
Exercises help prevent long-lasting damage and reduce the risk of future dislocation. These shoulder dislocation exercises are gentle at first, then get harder to build up your shoulder strength. In this article, we will discuss the best exercises for recovery from shoulder dislocation.
These exercises should not be used without supervision from a shoulder surgeon or physical therapist.
Book a Consultation with Dr. Pamela Mehta, MD
The Best Orthopedic Surgeon in San Jose
Dr. Mehta is a board-certified orthopedic surgeon who can help you recover from your joint condition. If you:
- Are Suffering From Pain and Mobility Issues
- Need Orthopedic Assessment and Advice
- Want Treatment From a Top Orthopedic Doctor
We Can Help
The 7 Best Shoulder Dislocation Exercises
For the first couple of days following shoulder dislocation, you should try to keep your arm as still as possible. This helps to dampen inflammation. However, once the inflammation has started to settle you should introduce gentle exercises. This will be directed by your orthopedist or physical therapist.
Shoulder pain and stiffness gets worse if you keep your arm still for too long. Successful dislocated shoulder rehab exercises get your shoulder moving shortly after treatment for dislocation.
For each of these exercises, stop if you feel any pain in your shoulder. Do not attempt these until your treating clinician tells you that you can introduce gentle exercise. You should wait at least 3 days following the dislocation before starting.
Some of these shoulder dislocation exercises will also be suitable for shoulder separation, which is different from dislocation. Take care to consult a shoulder doctor if you have other conditions such as shoulder bursitis.
*If you have had shoulder surgery, please check with your orthopedic surgeon when you can start exercises*
Exercises While Your Arm Is Still in a Sling
After 3 days of your arm being in a sling, you can potentially introduce some very gentle exercises to prevent shoulder weakness. You can start to build up these exercises as your shoulder heals, but make sure this is at the direction of your doctor or physical therapist.
Aim to do all these shoulder dislocation exercises four times per day. If you feel any pain in your shoulder, or discomfort lasting longer than 10 seconds, stop the exercise.
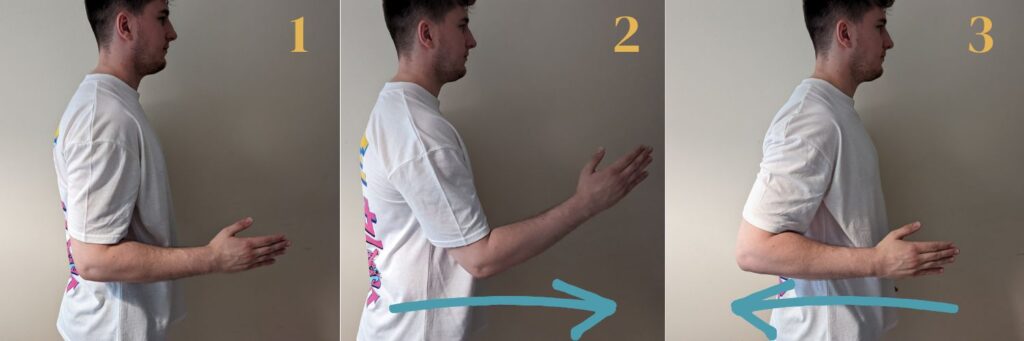
1. Modified Shoulder Flexion & Extension
While your arm is still in a sling you need to avoid any overhead exercises. For this reason, we will do a modified shoulder flexion and extension, which we will change to the full version once you’re out of your sling.
When you are first able to introduce gentle exercise, start by bending your elbow at 90 degrees while your arm is at your side. You can then move your arm backward and forwards like you are power walking, taking care to avoid any painful movement.
Do this slowly, 10 times for each movement, repeating 2-3 times in the day.
If this movement doesn’t cause any pain, you can start to introduce resistance to this exercise. Place a pillow on the wall and start with your back facing the wall. Bend your arm and push against the wall with your elbow, holding for 10 seconds. Repeat this 10 times.
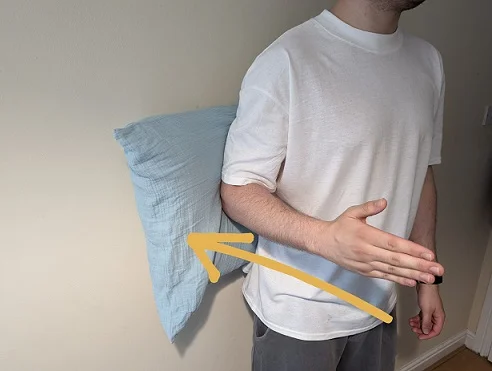
Then, move so that you are facing the wall. Using the same starting position, this time you should be pushing your fist against the wall while your elbow is at your side. Again, hold this for 10 seconds, repeating it 10 times. Repeat this 2-3 times per day.
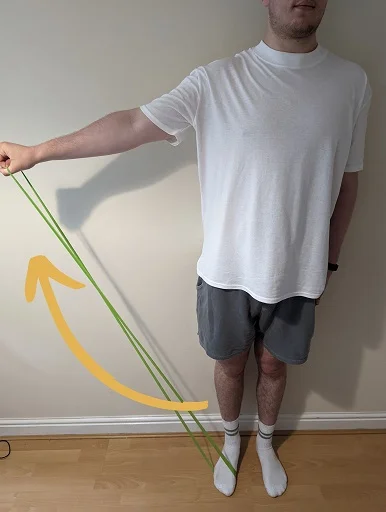
2. Shoulder External Rotation
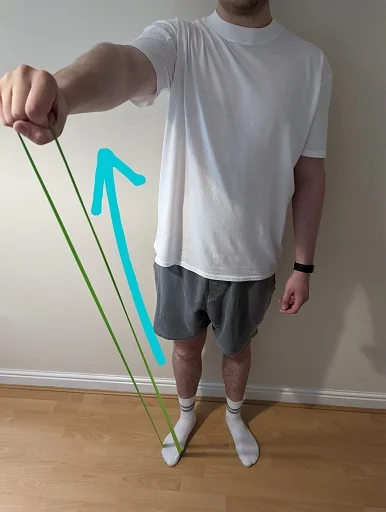
Start by holding something elastic, such as an exercise band, in both of your hands. Hold the exercise band out in front of you at waist height with your elbows at your sides, bent at 90 degrees. Your palms should be facing downward.
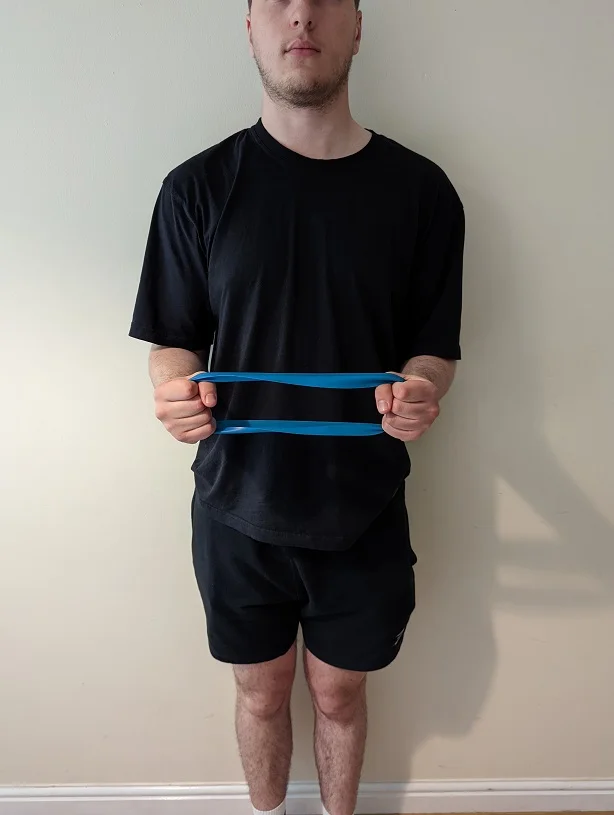
Pull the band apart gradually until you feel a light stretch in your arm – keeping your elbows tucked in!

Restore your hands to their original posture by slowly bringing them back together. Repeat this 10 times and do 2-3 sets per day.
3. Modified Shoulder Internal Rotation
The usual internal rotation exercises require overhead movement, which is avoided after dislocation. We will use a modified exercise until your shoulder has gained some strength. This is also known as an isometric exercise.
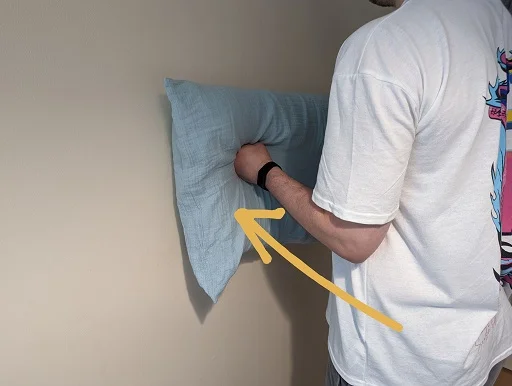
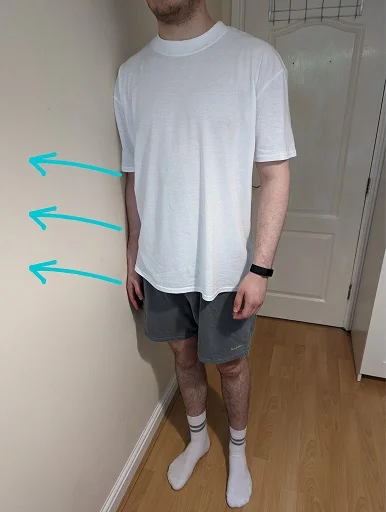
Grab a pillow and find a doorway with plenty of room on each side. Place your arm at your side and your elbow bent 90 degrees, palm facing towards your body. Position yourself so that your hand and pillow are touching the wall.
Keeping this same position, press against the wall with your hand like in this picture.
Hold for 10 seconds, then repeat 10 times. Try to do this 1-2 times per day.
Shoulder Dislocation Exercises After Your Sling is Removed
Once your sling is removed, you can start to build up your shoulder strength. This is the time for shoulder dislocation rehabilitation exercises.
It’s important that you progress slowly, stopping if you feel pain or significant discomfort. Your doctor will advise you on when you can start these more intensive shoulder dislocation exercises.
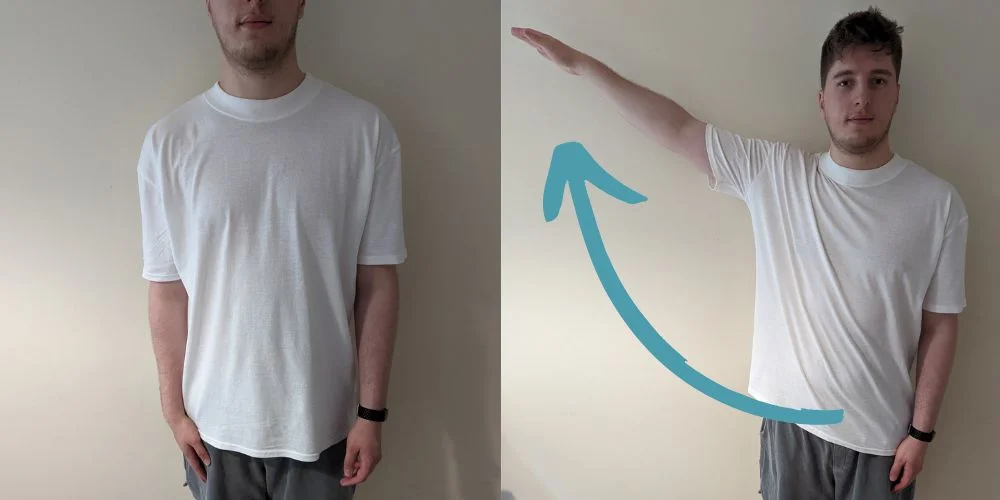
1. Shoulder Flexion
As this is an overhead exercise, it is important to avoid causing any damage to your recovering shoulder. If you experience any pain at all, or discomfort that lasts longer than 10 seconds, move back to the modified shoulder flexion exercise. Stand up with your arm at your side and your palm facing your thigh.
Slowly raise your arm in front of you, keeping the arm straight, until your fingers are pointed up at the sky.
Hold this position for 5 seconds, then return to the starting position. Do this 10 times.
Repeat this 3 times throughout the day, taking plenty of rest between each set.
Eventually, you can introduce a resistance band into this exercise – holding the band under your foot and slowly lifting it above your head.
2. Shoulder Abduction
To start with, use isometric exercises (strengthening exercises where there is no movement). This helps to introduce gentle shoulder strengthening exercises.
Stand sideways next to a wall with your arms to your side. Your palms should face inwards, and the outside of your hand should be touching the wall. Push outwards against the wall as if you are trying to raise your arm to the side.
Do this for 10 seconds, repeating it 10 times.
Once you are in less discomfort, you can try this without isometric exercises. With your arms at your side, slowly lift your arm above your head. Hold for 5 seconds before going back to the original position.
Be careful not to raise your arms up too high, especially if it causes pain.
Once your shoulder strength is returning, use an exercise band for this exercise to help gain additional strength.
3. Wall Push-Ups
Stand one foot away from a wall. Place your hands in front of you at chest height on the wall, slightly wider than shoulder-width. Keep your elbows tucked in while you gently lean into the wall and push back to the original position.
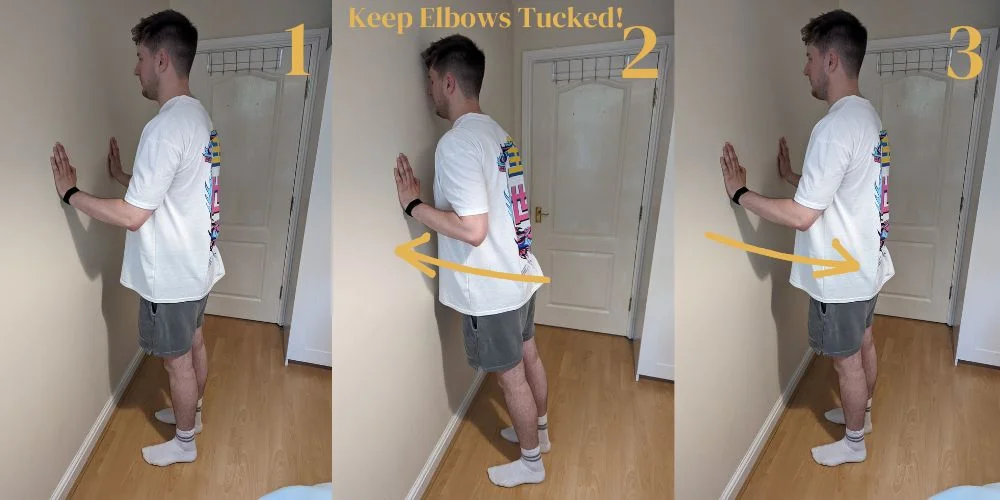
As you gain strength and confidence in your movements, increase the distance you are from the wall.
4. Shoulder Internal Rotation
Find a towel, resistance band, or something similar for shoulder internal rotation. With the hand that is not affected, hold one end behind your head.

Reach behind you and grab the towel at the level of your lower back with the affected arm.
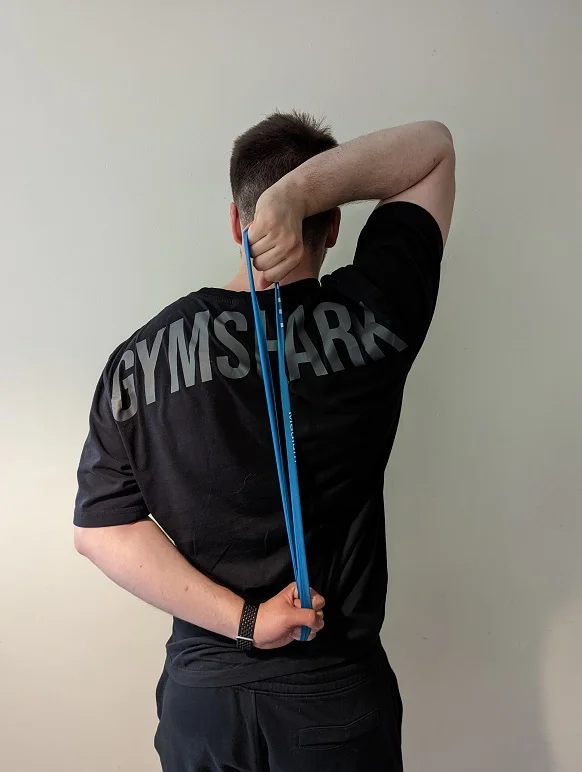
Lift your lower hand toward your shoulder blades by gently raising it with your uninjured arm. Hold it here for 30 seconds as you continue to elevate so that you can feel it stretching without any pain.
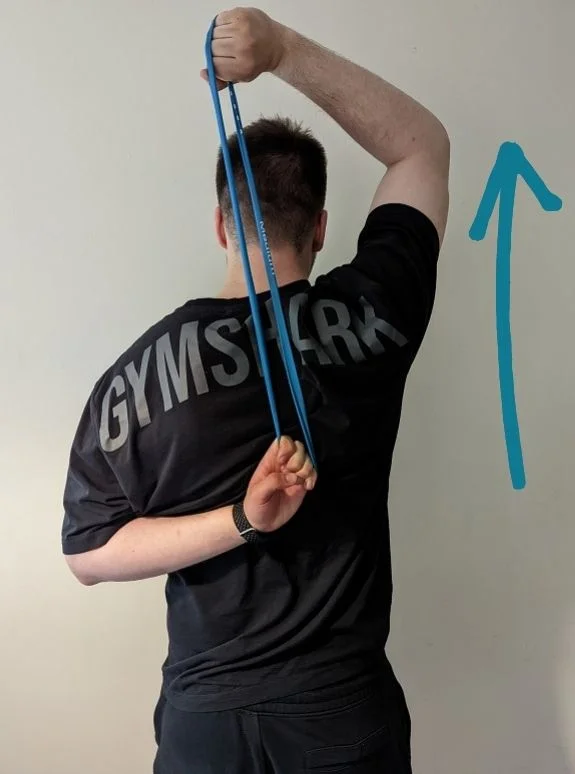
After a little pause, go back to your starting posture and repeat. Repeat this set of two twice throughout the day.
You can also use the shoulder external rotation exercise we described above.
Stretches For a Dislocated Shoulder
Stretches after a shoulder dislocation are vital to regaining your flexibility. While the shoulder dislocation exercises above will help your strength, you may still feel stiff in your shoulder as movement has been limited.
Please keep safe by following guidance on stretches from your physical therapist or orthopedist!
Some common stretches used in shoulder rehab often involve gentle assistance or passive movement. Here are a few examples:
Towel Stretch
Follow the steps similarly to the internal rotation exercise above, but use a towel.

Rather than trying to test your strength, gently pull your arm upwards until you feel a stretch.
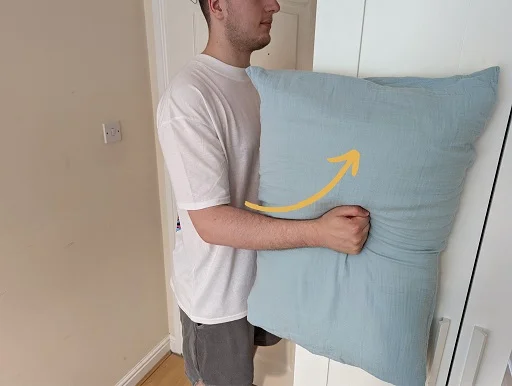
Lying Overhead Stretch
Lie on your back with something held in both hands, such as a tin can.
Slowly guide your hands overhead, stretching your chest and shoulder capsule, like in the photo below.
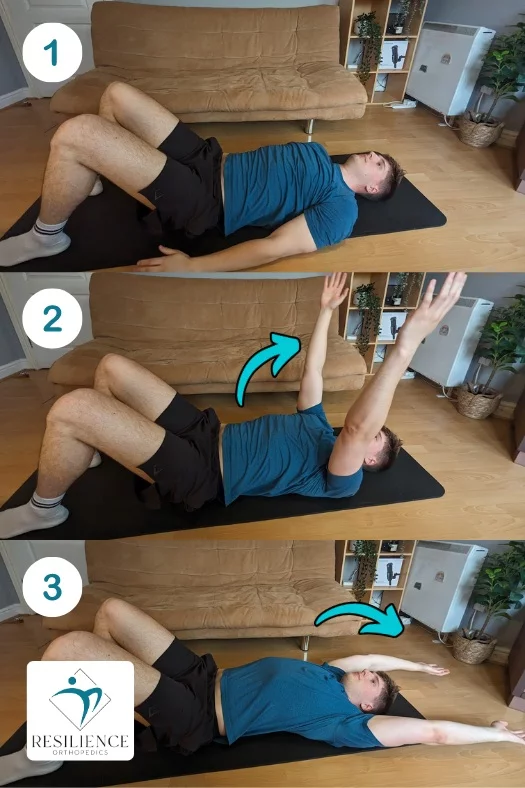
Another stretch might involve lying on your back with a dowel rod held in both hands. Your physical therapist can slowly guide the dowel overhead, stretching your chest and shoulder capsule.
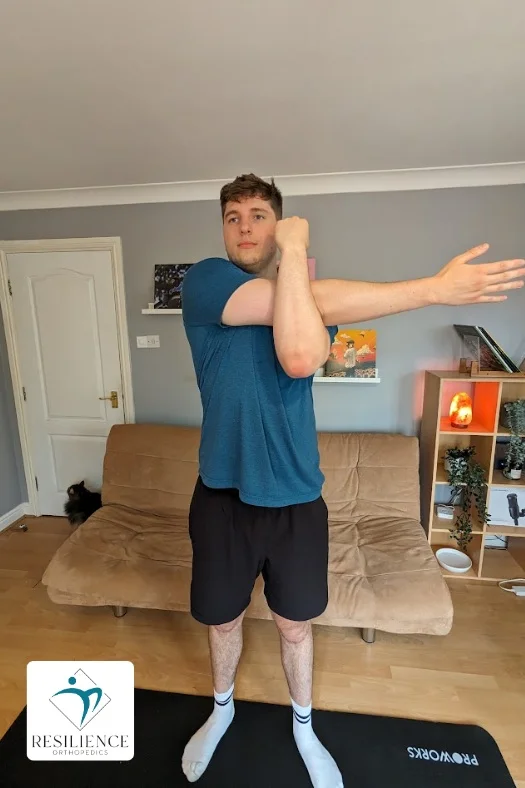
Cross Body Stretch
Stand tall with your feet shoulder-width apart. Take your right arm across your chest.
Use your left hand to gently press your right arm towards your body until you feel a stretch in your shoulder. Hold for 15-30 seconds, then switch sides.
Remember, these are just examples. The key points are to prioritize gentle movement, avoid pushing through pain, and always listen to your orthopedic doctor’s guidance for a safe and effective recovery.
Exercises to Avoid After Shoulder Dislocation
After a shoulder dislocation, avoid exercises that put extra stress on your healing shoulder joint.
This means steering clear of movements that add weight or pressure when your arm is raised overhead.
Listen to your body and avoid any exercise that causes pain. It’s best to consult a healthcare professional for a personalized shoulder dislocation rehabilitation plan to regain strength and stability in your shoulder.
Here are some examples to avoid in the early stages:
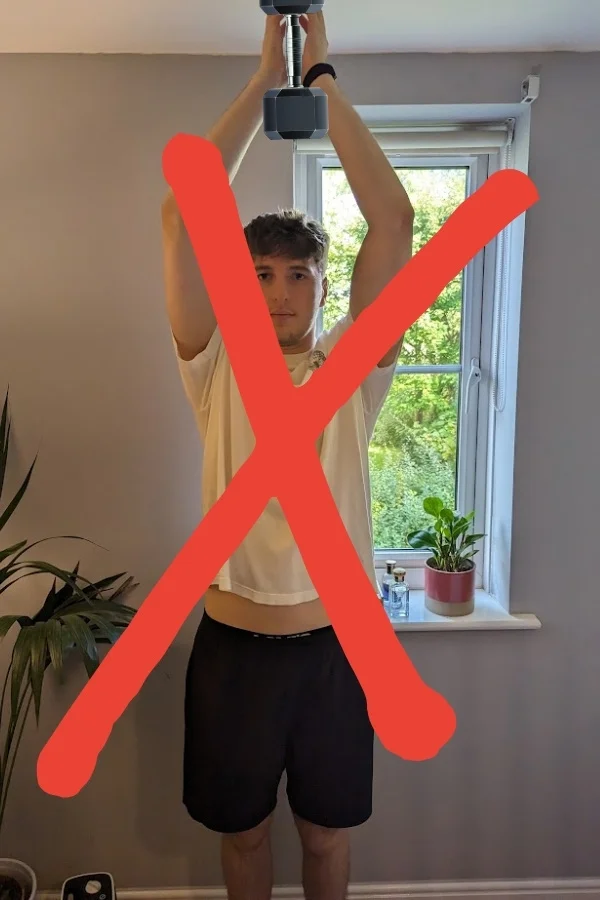
Lifting Weights Overhead
Don’t make any movements that lift weight over your head. This could cause your shoulder to slip back out of its socket and dislocate again.
This includes exercises like shoulder presses, dumbbell raises, and pull-ups.
Throwing
Avoid exercises that involve throwing or quickly changing the direction of your arm.
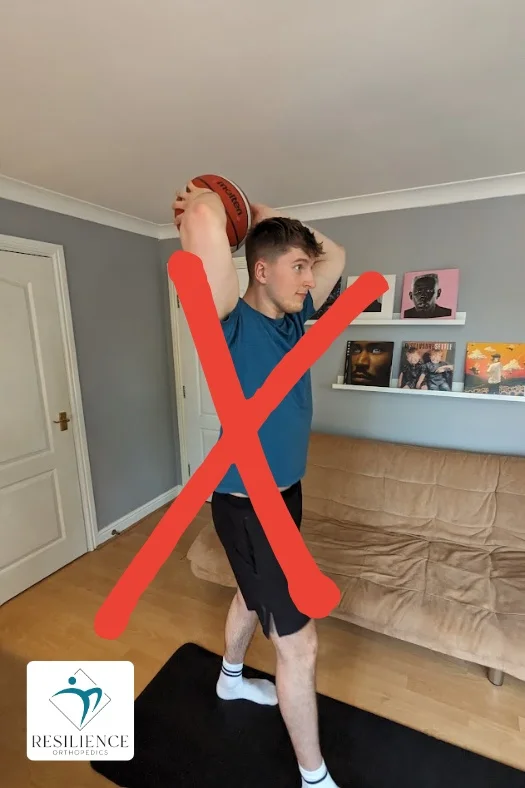
Activities like throwing a baseball or tennis ball can strain the recovering shoulder.
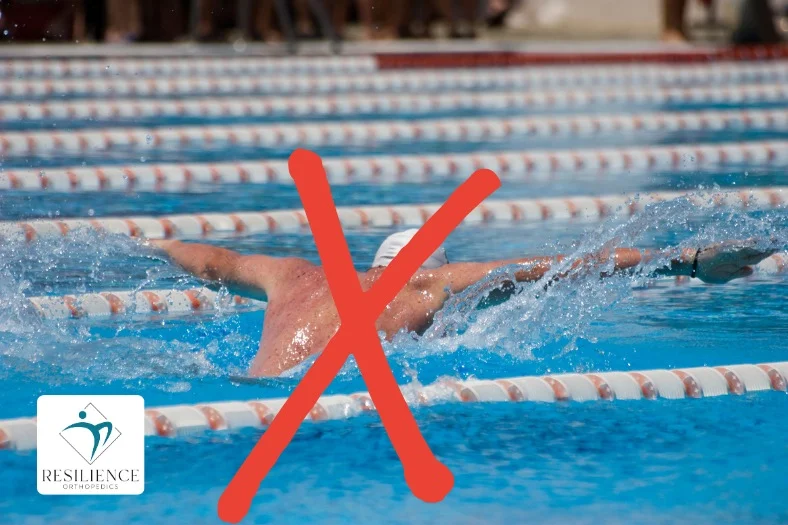
Certain Swimming Strokes
Avoid strokes that require overhead arm movements, like freestyle or butterfly.